Pro tips for placing kitchen cabinet hardware

There are so many fun decisions involved in completing a modern kitchen remodel, with a crucial one being the placement of your cabinet hardware. This list of simple recommendations can help you determine where and how to install decorative cabinet hardware and prepare for a conversation with your kitchen designer.
Manufacturers typically do not pre-drill your cabinets for cabinet hardware, because knobs, handles, and pulls vary drastically in size, finish, and style. Therefore, the manufacturer doesn’t want to limit a homeowner in choosing their perfect match. Identifying the hardware that works best for the style and function of your cabinets is a critical design element, and an experienced kitchen designer can help guide you through the selection and placement process.

Photo from MasterBrand Cabinets.
Once your cabinet hardware is in place, it most likely cannot be moved. You don’t want to find yourself having to reorder cabinet doors because your original hardware placement isn’t what you had in mind!
Read on for tips and tricks about how to install the perfect hardware for your unique, modern kitchen design. Once you have a sense of what you like, launch the Rebode Kitchen Jumpstarter tool to try out different cabinet styles without ever drilling a hole in your cabinet doors. From there, we can match you with a local kitchen designer who can work with you to finalize your cabinet and hardware selection and installation.
Placing decorative hardware on base kitchen cabinet doors
Your kitchen designer will guide you through placing hardware on your kitchen cabinets, but we’ve also outlined the steps so you can begin thinking about what would work best for your space. To find the correct placement for cabinet hardware on a standard base door, follow this simple process:
- If your kitchen cabinet profile has a shaker doorstyle (in other words, not a flat or slab profile), locate where the rail and stile meet in the inside top corner of the door. The rails are the horizontal pieces of wood that make up a cabinet door frame, while the stiles are the vertical pieces.
- After deciding the best placement for your hardware on the left or right side, place painter’s tape along the stile to allow for pencil marks. Do not mark on the finished cabinet.
- Starting from the inside profile, draw a straight line to the outer edge of the door as a guide. Typically, it would look best not to install your hardware above that area.
- Next, find the center of the flattest space on the stile and mark it with your pencil (again, on the painter’s tape). You will then measure the distance from the center of one of the drill holes to the center of the other hole of the drawer pull you want to install (this measurement is commonly called center-to-center or c/c).
- Finally, mark your c/c on the tape and lay the decorative hardware over on its side. Line up the screw holes with the pencil marks for a final check before drilling. If you are installing knobs, you’ll find the center of the straight line and drill your hardware in that location.
This is a great general guideline for knobs and pulls, as this installation process allows for plenty of clearance around the decorative hardware and is both functional and aesthetically pleasing.
When installing cabinet hardware on slab doors, a general rule is to place knobs and pulls 1 inch over and 3 inches down from the top of your base cabinet door.
DESIGNER TIP #1: Typically, a hardware template works well for cabinet doors if you are wanting to place all pulls or knobs in the same location throughout the kitchen. But placing hardware on drawers can have challenges from a consistency standpoint: typically, not all drawers are equally sized, which requires hardware placement to vary throughout the kitchen. A template might become more of a frustration than an asset in this case.
DESIGNER TIP #2: When placing hardware on wall cabinets, follow the general guide for base doors, but reverse the rules. You’ll find where the stile and rail meet in the bottom left or right corner as the decorative hardware will be towards the bottom of the door for functionality purposes.
Placing hardware on kitchen cabinet drawers
Kitchen cabinet drawers come in all different shapes and sizes, and it’s important to keep that in mind when determining the best placement for knobs and pulls. As your designer will tell you, the most crucial step before you start installation is to adjust all your drawer guides throughout the kitchen: ensure that each drawer is perfectly plum and that all are aligned. If this step is missed, you risk misaligning your hardware when you install it.
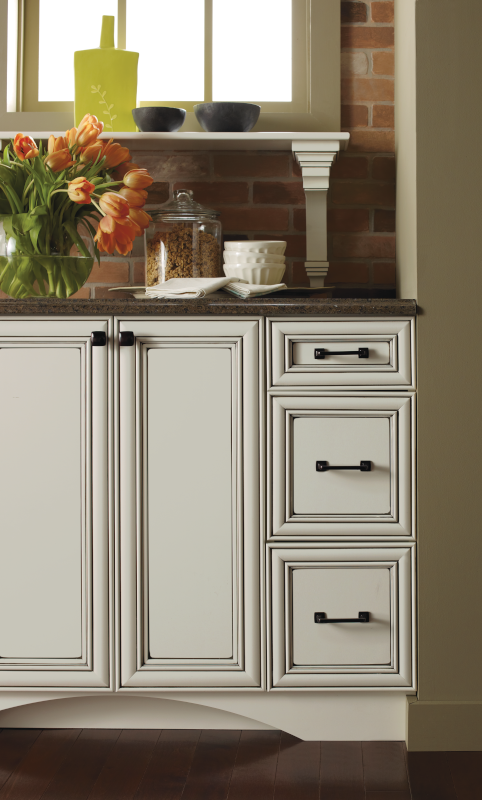
Photo from MasterBrand Cabinets.
The most appealing place to install hardware on drawers is in the center, but you should make sure that any interior storage, such as cutlery organizers, won’t interfere with that placement. Here is a step-by-step guide to placing cabinet drawer hardware:
- To start, remove the drawer box from the cabinet and stand upright on a flat surface.
- Place painter’s tape in the approximate center of the drawer and then use a tape measure and pencil to mark the center. If you are installing a single knob, that is the drill location. If you are installing a pull, you will measure the hardware’s center-to-center.
- Once that measurement is determined, divide that number by two. Find the center mark again and measure out to the right and then to the left to mark the screw holes.
- Check if your hardware is straight by either measuring from the top of the drawer down to your pencil mark or by using a small level. Keep in mind that the screw length needed when installing hardware on drawers is typically longer as it needs to go through the drawer front and drawer box. Typically, the screws included with the hardware will have multiple locations to snap off excess length as needed.
DESIGNER TIP #3: If your drawer is 12″ to 30″ wide, typically one decorative pull will suffice. However, if your drawer width exceeds 30″, consider placing two pulls or one longer pull on that drawer to allow for proper weight distribution when opening. Plan ahead to determine how many pieces of hardware each cabinet needs before ordering. You can also add painter’s tape to each cabinet where the hardware will be placed to visualize whether a pull or a knob is needed, especially if you are mixing hardware in the space.
Choosing hardware for wall and base pullout cabinets
The popularity of base and wall pullout storage is growing rapidly in modern kitchen designs. For example, waste and recycle bins are currently in the top five of cabinet must-haves among homeowners. However, because these kitchen cabinets function differently than regular base ones, the hardware placement process also differs.
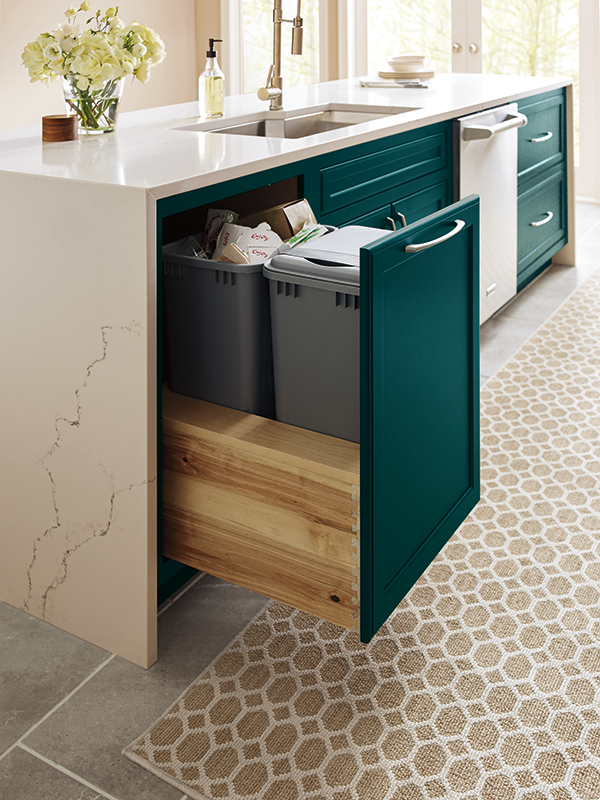
Base pullout cabinet with a drawer pull. Photo from MasterBrand Cabinets.
When installing decorative cabinet hardware on wall and base units, it’s always best to consider using a drawer pull on the top rail of the door as opposed to a knob. Given these doors are typically heavier—and the interior components also add weight—a knob tends to be more difficult to use. Therefore, drawer pulls are the easier and more efficient option. Consider a reasonably sized pull that is placed horizontally in the center.
The same rule applies to wall cabinet pullouts. Be extra cautious that you don’t interfere with any of the cabinet components before you choose the location and start drilling, though!
Getting started
Kitchen cabinet hardware is both a functional and stylistic piece of your cabinet doors. It adds character, and it can be a great design element to any space. Now that you have a sense of how to select and place appropriate pulls and knobs for your cabinets, the Rebode Kitchen Jumpstarter tool can help you visualize which cabinets and hardware best suit your space at a price within your budget. We can also match you with a local kitchen designer, with whom you can discuss your ideas and collaborate to install the perfect hardware on your new cabinets.